
Электрическая духовка скарлет инструкция по применению
Обновлено: 17.05.2024
Обозначения на духовом шкафу в виде иконок или значков помогают хозяйке выбрать подходящий для случая режим работы устройства. Расшифровка обозначений обязательно должна присутствовать в инструкции по эксплуатации.
Современные духовки радуют своих хозяек обилием полезных режимов и функций. Но разобраться в них бывает не так уж просто, особенно когда приходиться читать не рекламные проспекты, а маленькие значки на панели управления. Пиктограммы вокруг поворотных ручек, на кнопках и даже на сенсорных экранах многочисленны и разнообразны – так что с первого раза все их не запомнить, и уж тем более не разобраться, что они обозначают. Конечно, стоит сперва ознакомиться с инструкцией к вашей модели духового шкафа, но порой и в ней может не оказаться ответа на этот простой вопрос.
Обозначения часто отличаются в зависимости от того, кокой тип управления реализован в той или иной модели. Поэтому разобьем их на группы по тому же принципу, чтобы было проще ориентироваться.
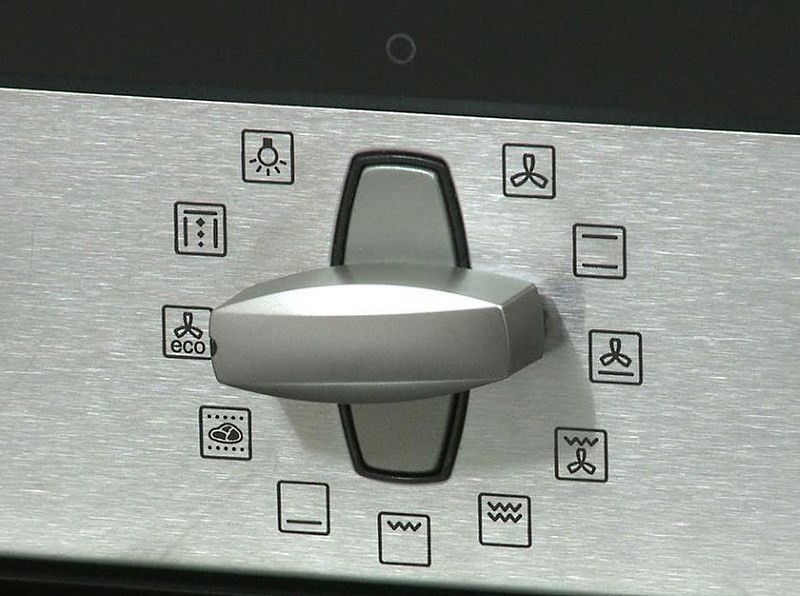
Механическая панель управления
Обычные поворотные ручки чаще всего встречаются на недорогих духовках с небольшим количеством режимов, а также на газовых моделях, поскольку и они не отличаются богатым функционалом. Число пиктограмм здесь обычно невелико и разобраться с ними будет проще. Легче всего сориентироваться с показателями таймера или терморегулятора, вокруг которого производитель незатейливо прописал температуру нагрева. С прочими иконками придется знакомиться.
Самые популярные обозначения:
При использовании конвекции в духовом шкафу рекомендуется выбирать температуру нагрева на 20-40 °С меньше, чем в случае с обычными режимами.
Иногда на панелях духовых шкафов встречаются простые и узнаваемые символы режимов конкретных блюд, например, для выпечки пиццы, хлеба или кондитерских изделий. Здесь несложно догадаться о назначении выбранной опции, но ее характеристики (время приготовления и температуру нагрева) лучше уточнить в инструкции.
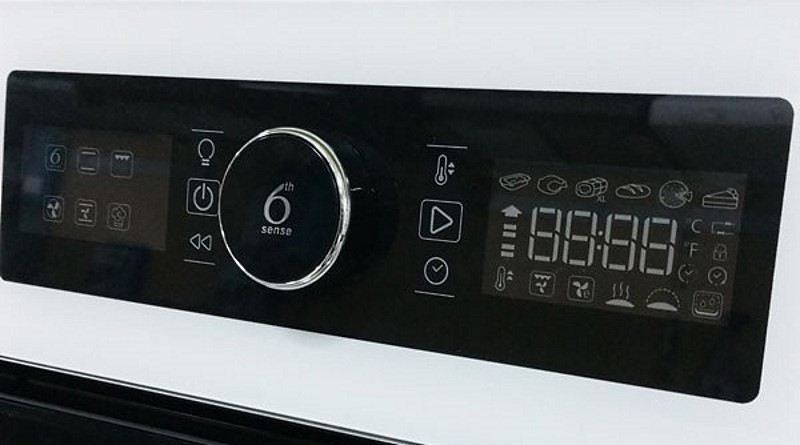
Электромеханика
Такая панель управления позволяет точнее устанавливать и контролировать режимы работы духового шкафа. Поэтому здесь используются свои значки – в гораздо большем количестве. И хотя у разных производителей может быть свой набор пиктограмм, крупные и наиболее популярные марки вроде Siemens, Bosch, Electrolux и Hotpoint-Ariston предпочли упростить задачу своим покупателям и придерживаются примерно одинаковой системы обозначений.
Сегодня появилось довольно много дополнительных пиктограмм для различных режимов конвекции. Рядом с вентилятором могут быть такие обозначения:
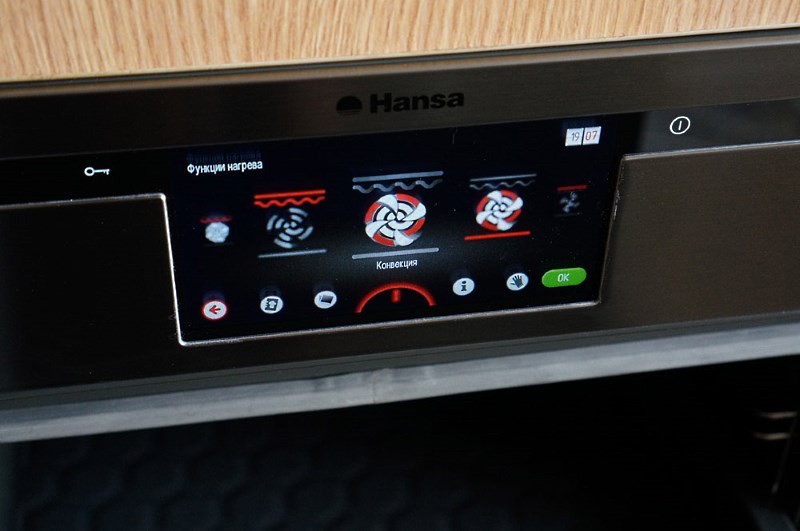
Сенсорный экран электронной ПУ
Светодиодные символы выглядят на экране такой панели симпатично и интригующе. А все потому, что их здесь может быть неограниченное количество, чем и пользуются производители, придумывая новые обозначения для внедряемых режимов готовки. Кроме того особенности работы сенсора позволяют выставлять для отдельных программ дополнительные опции, которые также высвечиваются в виде иконок.
Отдельно стоит рассмотреть пиктограммы духовых шкафов с функцией приготовления на пару. Обычно здесь используют 4 варианта:
Значки на духовом шкафу помогают выбрать правильный режим приготовления для любого блюда. Поэтому не стоит их игнорировать, чтобы не разочаровываться в своей кухонной технике. Изучайте расшифровку пиктограмм и характеристики соответствующих программ. А когда вы познакомитесь со всеми основными функциями новой печи, никакие подсказки вам уже не понадобятся.
Important safety procedu res. Read attentively and keep for further referenc es.
• Incorrect use of this appliance may cause its failure and damage to the user.
• Before using for the first time check , whether the tech nical specifications of the product indi cated on the label
correspond to the electric supply network parameters.
ATTENTION! The power supply plug has a phase a nd an earth connection. Plug the applia nce only into properly
• Only for household use in compliance with this Instru ction Manual. The applia nce is not intended for commerci al
• Do not use outdoors.
• Always unplug the appliance before cleaning or wh en not in use.
• The appliance is not intended for use by persons (including children) with redu ced physical, sensual or
intellectual abilities or if they lack the experience or kn owledge, unless they are supervised o r have been
instructed on operating the appliance by t he person responsible for their safety.
• Children must be supervised to prev ent playing with the appliance.
• Do not leave the operating appliance unattended.
• Do not use accessories other than the standard equipment.
• To avoid danger damaged power supply cord mu st be replaced by the manufacturer or the authorized service
centre, or similar qualified personnel.
• Do not immerse appliance or cord in wat er or ot her liquids. If this happened immediately unplug the appli ance
and before operating it further, have qualified spe ciali sts check the operating cap ability and saf ety of the
• Make sure cord does not touch sharp ed ges or hot surfaces.
• Do not pull by the cord, do not twist it or wrap it around the appliance.
• Use the bread maker only for cooking food. Neve r dry clothes, pap er or other things in it.
• Do not switch the bread maker on with an empty baking chamber. Do not use the baki ng chamber for storing
• The bread maker is not intended for food canning.
• Do not pour ingredients into the baking cham ber directly, use the removable pa n.
• Use cooking recipes for guidance.
• To avoid short circuit failure or bread maker malf unction prevent water entry into the steam ve nts.
• Failure to keep the bread maker clean may lead to su rface wear, which might h ave an adverse effect on the
operation of the appliance and create potential dang er for the user.
• When using an extension cord make sure the maximum power capacity of the cord corresponds to the po wer
consumption of the bread make r.
• Attention! During operation the appliance gets hot! If nece ssary to touch the bread maker durin g its operation
use oven mitts or pot holders.
• Avoid touching the kneading paddle during the unit is in operation, this may cause injury!
• ATTENTION! During operation do not open the bread maker lid or remove the bread pan.
The lid may only be opened for adding n ecessary ingredients into the dou gh strictly when the beep is heard .
• The manufacturer reserves the right to introduce mino r change s into the product design witho ut prior notice,
unless such changes influ ence significan tly t he product safety, performance, and functions.
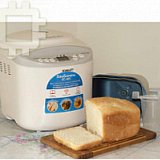
ADVANTAGES OF YOUR B READ MAKER
• The bread maker has an automatic bread baki ng mode.
• You can select out of 13 different baking programmes.
• You can use pre-packaged bread mixes.
• The bread maker allows making jam.
• You can knead the dough for ravioli (pelmeni) or other cou rses.
• Make sure there are no packaging mate rials or foreign objects insi de the bread maker.
• Check that the following have not been damaged during ship ping:
• Main body and viewing window;
• Removable bread pan.
• If you discover any defects do not operate the bread maker; addre ss the seller.
• Place the unit on a dry, even and heat-resistant surface.
• Do not place the appliance near combustible ma terials, explosives or self-ignitin g gases.
• Do not place the appliance near a gas or an el ectric cooker or any other heat sources.
• Do not put anything on the bread ma ker. Do not clog steam vents.
• The bread maker should not be placed in a cupboa rd. To ensure normal operation of the bread maker fre e
space for ventilation should be left. at least: 20 cm on top, 10 cm at the back panel, and at least 5 cm at both
• Before first use wipe bread baking pan, kneading pa ddle, inner and outer parts of the bread maker with a clean
wet cloth. Peel the protective film from the control panel.
• Plug the bread maker to the outlet.
• Place the ingredients in the bread maker (according to the recip e) and close the lid.
• Load the desired baking programme. The number of the pro gramme and the respective baking time will ap pear
on the LCD display.
• Attention: a sound should be heard when pressing bu ttons.
• The crust colour function allows to programme baking bread with light, medium or da rk crust.
• Press the CRUST button once, twice or three times to have light, medium or dark crust respectively.
• ATTENTION: If you select programmes 5-13 you cannot adjust the crust colour.
• ATTENTION: When selecting programmes 1-3 the C RUST button allows to set the QUICK mode, wh en the
bread is baked in express mode.
• The possibility of choosing the colour of t he crust is not envisaged for the QUI CK mode.
• This function allows to set the weight of the bak ed loaf. The weight of the loaf is 500 g / 750 g / 1000 g
• Press the SIZE button once, twice or three times to set 500 g / 750 g / 1000 g respectively.
• ATTENTION: If you select programme 5-13 you cannot adjust the loaf size.
• To start/stop the operation of the bread maker or rese t the sele cted function press the START/STOP BUT TON.
• To end an operation or delete the parameters press and hol d the button for 2 seconds until a long audio signal
• ATTENTION: Do not press the START/STOP BUTTON if y ou want to check the state of the dough. To check the
dough use the window in the bre ad maker lid.
• In case of a power supply failure during less t han 7 minutes the bread maker will resume the selected
programme from the moment there was a power outage.
• After the baking is complete, the bread maker will automatically proce ed to the keeping warm mode – 60
• After the baking is complete the beep will sound 5 times with a 5-m inute interval.
• The timer function allows to delay bak ing time.
• Maximum delay time is 13 hours.
• Use buttons + and - to add or take 10 minutes of delay with each pressing. Then pre ss the START/STOP button
to activate the timer. The countdown will start at the display.
• For example: it is 20:30 now, you w ant the bread to be ready by 7:00, i. e. in 10 hours and 30 minutes. Press the
MENU button, select the mode, sel ect the colour of the crust and the loaf size, then press the + button to add
time to 10 hours 30 minutes. The time will appear on the LCD display. Then pres s the START/STOP button to
activate the timer. The countdown will start at the display.
• ATTENTION: do not use timer when using perishable ingredients such as eggs, milk, cream, and cheese.
• To select the necessary pr ogramme press the MENU button.
Baking programme 1. Basic
• This mode is used for baking white and mixed breads. Fo r baking bread rye or wheat flour is u sed. The loaf is
light and compact. See the list of ingredients for bakin g in the table at the end of the Instruction Manual.
Baking programme 2. French
• This mode is used for baking bread with light texture and crispy crust from wheat flour. See the list of ingredients
for baking in the table at t he end of the Instruction Manual.
Baking programme 3. Diet
• This mode is used for baking bread from coarse fl ours. In this mode dough kneading takes a longer time, and
dough rises much longer. The loaf is he avy and compact. See recipes for bakin g in the table at the end of the
Baking programme 4. S weet
• This mode is used for baking bread with various sweet additives, such as fruit juices, ground nuts, dried fruit,
chocolate or sugar. In this mode the time for bread rising is increased, an d so the bread is of light texture. See
recipes for baking in the table at the end of the Instruction Manual.
Baking programmes: 5. Quick 1000 g; 6. Rapid baking 500 g; 7. Rapid baking 750 g
• In these modes the processes of kneading, rising and baking are significantly reduced and do not take mu ch
time. As a result the bread is of the coarsest texture of all 12 offered modes. See recipes for b aking in the table
at the end of the Instruction Manual.
Additional ingredients: Programmes 1-5
• For modes 1-5 adding further ingredients, such a s nuts or fruit is possible after a n audio signal, which will sound
according to the bread baking programm e.
• In case timer is set fruit and nuts can be added at the beginning but these are to be cut into small pieces.
Baking programme 8. Gluten free
• Baking gluten free bread is significantly different from baking re gular breads. If you bake this bread because of
health reasons consult your doctor an d follow the instruct ions closel y. This programme was specially de signed
for gluten free bread mixes. The result may be different depending on the mixture type. If this bread is chose n for
diet reasons, it is very important to prevent getting other flour containing gluten into the dough.
Baking programme 9. Dough
• This mode is used for kneading dough. In this mode only knea ding is done without further baki ng. See recipes in
the table at the end of the Instruction Manual.
Baking programme 10. Ravioli
• This mode is used for kneading dough for pasta, raviol i or pizza. In this mode only kneading is done without
further baking. See recipes in the tabl e at the end of the Instruction Manual.
Baking programme 11. Jam
• This mode is used for making jam. See recipes in the table at the end of the Instruction Ma nual.
Baking programme 12. Baking
• This mode is used for additional baking in ca se the br ead has not baked completely or the cru st is not crisp
roasted enough, as well as for baking ready doug h. See ba king time in the table at the end of the Instruction
• For an early stop press the STOP/START button and hol d it down for 2 second s until an audio signal sou nds.
Baking programme 13. Cake
• This mode is used for making cake s and pies. See the re cipes in the table at the end of the Instruction M anual.
• First you need to take out the removable bread pan, add necessary ingredi ents and only after that put the pan
into the bread maker.
• Always follow the order of adding ingredients. First add liquids, butter, sugar, salt, then flour and the rest of
ingredients, add yeast at the end.
• All ingredients must be at room temperature to support optimal leavening of yea st.
• Measure the amount of ingredients precisely. Even slight deviation from the amount indicated in the recipe can
affect the result of baking.
• During operation do not open the bread make r lid or remove the bread pan.
• The lid may only be opened for adding necessary ingredient s into the dough (to ast, candied fruit, etc.) strictly
when the beep is heard. During the ope ration the beep will sound 8 times, when ingredient s are to be added.
• Opening the lid at other times leads to the violation of temperature conditions in the bread ba ker and can affect
the quality of bread baking.
• Remove the bread pan.
• Install the kneading paddle, check whether it wo rks.
• Put the ingredients into the pan.
• ATTENTION: make sure the yeast does not come in contact with salt or liquid.
Put the removable pan back into the bread maker.
• Make sure you have placed the pan correctly.
• Close the appliance lid.
• Plug the unit to the outlet. An audio signal will sound and the number of the prog ramme and the baking time will
appear on the display.
• Press the MENU button and select the programm e number.
• Select the crust colour and the loaf size.
• Now you can adjust the baking time with the timer.
• Press the START/STOP button to start the programme.
• When the baking is complete an audio signal will so und, and 0:00 will appear on the displ ay.
• Let the bread stand for some time.
• Before opening the lid unplug the appliance.
• Remove the pan with a pot holder or an oven mitten.
• Hold the pan upside down and shake gently. If the br ead does not go out easily you can use woode n or plastic
paddles to take the bread out of the pan . Never use meta l objects, they can scratch the surface of the pan!
• Let the bread cool down for 30 minutes, then you can cut it.

• ATTENTION: make sure the kneading paddle is not in the loaf. If this happened, remove it ca refully from the
bread. Never use metal objects, they can scrat ch the surface of the pan!
Before calling the service centre, please , familiarize with the below table.
The quality of gluten in you r flour is inad equate if you use flour other than bread flour.
(The quality of gluten can differ depending on the tem perature, humidity, flour
storage conditions and the time of harve sting)
• Try another type of flour, another manufacturer o r another flour batch.
The dough has become too hard, be cause you added too little liquid.
• Bread flour with high protein content absorbs more wa ter than other types, so try
to add another 10-20 ml water.
You use inadequate yeast.
• Use dry yeast from packages with an i nsc ription “quick-acting yeast”. Thi s type
does not need pre-ferment ation
You have put too little yeast or your yeast is stale.
• Use the measuring spoon from the set. Ch eck the ex piry date of the yeast. (Store
it in the refrigerator).
bread is rugged
Liquid was in contact with the yeast befo re kneading.
• Check that you h ave put the ingredient s according t o the order as given in the
You have put too much salt or not enou gh sugar.
• Check the recipe and measure the correct amount with the standard measuring
spoon, which comes with th e appliance.
• Check that salt or sugar are not present in other ingredients.
The brea d has a
You have used too much yeast.
too light texture
• Check the recipe and measure the correct amount with the standard measuring
spoon, which comes with th e appliance.
You have added too much liquid.
• Some types of flour absorb more water than others; try to redu ce the amount of
water by 10-20 ml.
The bread fe ll
The quality of your flour is unsatisfa ctory.
• Try flour of another manufacturer.
You have used too much liquid.
• Try to reduce the amount of water by 10-20 ml.
You have used too much yeast/water.
• Check the recipe and measure the correct amount with the standard measuring
spoon (yeast) / cup (water), wh ich come with the appliance.
• Check that no excessive water comes from other ingredi ents.
You have not enough flour.
• Weigh flour accurately with the weigh-scale.
You use too little yeast or your yeast is stale.
pale and sticky
• Use the measuring spoon from the set. Ch eck the ex piry date of the yeast. (Store
it in the refrigerator).
There was a power outage or the bre ad maker was stoppe d during the baking cycle.
• The bread making machine stops if it was stopped for more tha n 10 minutes. You
have to remove the bre ad from the pan an d start the cycle again with the new
There is flour left
You have used too much flour, or you h ave too little liquid.
• Check the recipe and measu re the correct amount of flour with the weigh -scale
or liquid with the measuring cup for liquid s, which comes with the set.
The bread is not
You have not inserted a kneadi ng paddle into the bread pan.
• Before you load the ingredients make su re the kneading paddle is in the pan.
• There wa s a power outage or the b read maker was stopped duri ng the baking
• The bread making machine switches off if it was stoppe d for more than 10
• Presumably you would have to start bread baking agai n but this coul d lead to
adverse results if the k neading has already started.
After the start of
This means that the temperature inside the oven is too low. It is necessary to move

Популярный российский бренд Scarlett очень известный как в России, так и за ее пределами. На сегодня, компания является достаточно популярной во всем мире. За время работы Скарлет приобрела уважение и хорошую репутацию как качественный и надежный производитель.
Инструкции Scarlett по типу бытовой техники:
- блендеры
- будильники
- вакуумные контейнеры
- вентиляторы
- весы
- гидромассажные ванны
- инфракрасные обогреватели
- йогуртницы
- конвекторы
- кофемолки
- кухонные приборы-измельчители
- маникюрные наборы
- масляные радиаторы
- массажеры
- машинки для катышков
- машинки для стрижки
- микроволновые печи
- миксеры
- мороженицы
- мультиварки
- мясорубки
- настенные часы
- овощерезки
- отпариватели
- очистители воздуха
- пароварки
- приборы по уходу за кожей лица
- пылесосы
- сауны для лица
- стайлеры
- сушки
- тепловентиляторы
- тостеры
- увлажнители
- фены
- фены-расчески
- хлебопечки
- чайники
- щипцы для волос
- электрические блинницы
- электрические камины
- электрические печи
- электрические чайники
- соковыжималки
- увлажнители воздуха
- плиты
- микроволновые печи
- мясорубки
- подогреватели для молока
- блендеры
Также, компания Scarlett производит специальную детскую коллекцию Дисней, в рамках которой изготавливаются настенные часы, будильники, весы, мороженицы и тостеры. Эта продукция выглядит очень красиво и необычно, она имеет изображения веселых диснеевских героев.
Бренд Скарлетт, за 15 лет своей деятельности, завоевал признание у большого круга потребителей. Люди могут использовать технику Scarlett для своего удовольствия и комфорта. Если Вы решили купить Scarlett бытовую технику, то не пожалеете о своем выборе.
Предлагаем Вам скачать инструкции Scarlett к различной электронике и бытовой технике. У нас можно бесплатно и без смс-паролей скачать любой мануал.
Scarlett инструкция
Ознакомьтесь с руководством по использованию техники перед началом ее эксплуатации. Инструкция Scarlett поможет Вам узнать все функции и дополнительные режимы Вашего устройства. Пользуйтесь техникой с удовольствием!
Scarlett SC-1051
Scarlett SC-1050
Scarlett SC-158
Scarlett SC-157
Scarlett SC-057
Scarlett SC-1161
Scarlett SC-1158
Scarlett SC-1153
Scarlett SC-050
Scarlett SC-254
Scarlett SC-250
Scarlett SC-252
Scarlett SC-1154
Scarlett SC-150
Scarlett SC-1169

Scarlett SC-CH833-1500
Scarlett SC-CH833-2000
Scarlett SC-FH53K04
Scarlett SC-FH53K05
Scarlett SC-OH67F01-7
Scarlett SC-FH53K10
Scarlett SC-FH53K11
Scarlett SC-FH53K03
Scarlett SC-FH53K07
Scarlett SC-FH53006
Scarlett SC-FH53K09
Scarlett SC-FH53K06
Scarlett SC-FH53K02
Scarlett SC-FH53005
Scarlett SC-FH53002
Scarlett SC-FH53004
Scarlett SC-FH53003
Scarlett SC-OH67B02-7
Scarlett SC-OH67B01-11
Scarlett SC-OH67B03-9
Scarlett SC-OH67B03-7
Scarlett SC-OH67B01-5
Scarlett SC-OH67B02-9
Scarlett SC-CH830-2000
Scarlett SC-CH832-1500
Scarlett SC-CH831-1000
Scarlett SC-IR250D01
Scarlett SC-CH832-1000
Scarlett SC-OH67B01-9
Scarlett SC-OH67B01-7
Scarlett SCA H VER6 1500
Scarlett SC 21.2009 S/SB
Scarlett SCA H VER2 2000
Scarlett SCA H VER2 1000
Scarlett SCA H VER2 1500
Scarlett SC 21.1507 S2/S2B
Scarlett SC 21.1005 S2/S2B
Scarlett SC 21.2009 S2/S2B
Scarlett SC 41.2009
Scarlett SC 41.1005
Scarlett SCA H VER1 2000
Scarlett SC-IR250D02
Scarlett SC 21.1507 S/SB
Scarlett SC 21.1005 S/SB
Scarlett SC 41.1507
Scarlett SCA H VER3 1000
Scarlett SCA H VER5 1500
Scarlett SC-059 (2014)
Scarlett SC-FH53001
Scarlett SC-2167
Scarlett SC-FH53001
Scarlett SC-059 (2014)
Scarlett SC-2167
Scarlett SC-153 (2013)
Scarlett SC-2159 (2013)
Scarlett SC-2166
Scarlett SC-2160 (2013)
Scarlett SC-2152 (2013)
Scarlett SC-2150 (2013)
Scarlett SC-2165
Scarlett SC-FH53K01
Scarlett SC-055 (2013)
Scarlett SC-1156 (2013)
Scarlett SC-054 (2013)
Scarlett SC-1150 (2013)
Scarlett SC-2151 (2013)
Scarlett SC-058 (2013)
Scarlett SC-1157 (2013)
Scarlett SC-1153 (2013)
Scarlett SC-1158 (2013)
Scarlett SC-1169 (2013)
Scarlett SC-1053 (2013)
Scarlett SC-1168 (2013)
Scarlett SC-152 (2012)
Scarlett SC-1162 (2012)
Scarlett SC-2051
Scarlett SC-2050
Scarlett SC-1054
Scarlett SC-1052 (2011)
Scarlett SC-1168 (2011)
Scarlett SC-051 (2011)
Scarlett SC-1169 (2011)
Scarlett SC-053 (2011)
Scarlett SC-1157 (2011)
Scarlett SC-058 (2011)
Scarlett SC-1156 (2011)
Scarlett SC-1164 (2011)
Scarlett SC-1158 (2011)
Scarlett SC-1165 (2011)
Scarlett SC-052 (2011)
Scarlett SC-1167 (2011)
Scarlett SC-1163 (2011)
Scarlett SC-2159 (2011)
Scarlett SC-2160 (2011)
Scarlett SC-2158
Scarlett SC-2152 (2008)
Scarlett SC-2151 (2008)
Scarlett SC-2150 (2008)
Scarlett SC-1168 (2008)
Scarlett SC-1167 (2008)
Scarlett SC-1166
Scarlett SC-2151 (2008)
Scarlett SC-2150 (2008)
Scarlett SC-1168 (2008)
Scarlett SC-1167 (2008)
Читайте также: